Click below to read other articles from our CLI intro series:
At the beginning of this series, we looked at the benefits of using the CLI shell on your machine. One of those benefits is the wide range of developer tools available that only have a CLI.
In this part of the CLI intro series, we’re going to focus on:
- Built-In Command Line Tools
- Installing More Command Line Tools
- Common Command Line Tools to Check Out
What is a Command Line Tool?
For those who are completely new to development terminology, command line tool is a general term used to describe a program, application or script that is run entirely from a CLI Shell. Command line tools do not include a GUI, simply taking text input from the user and printing the results to the screen.
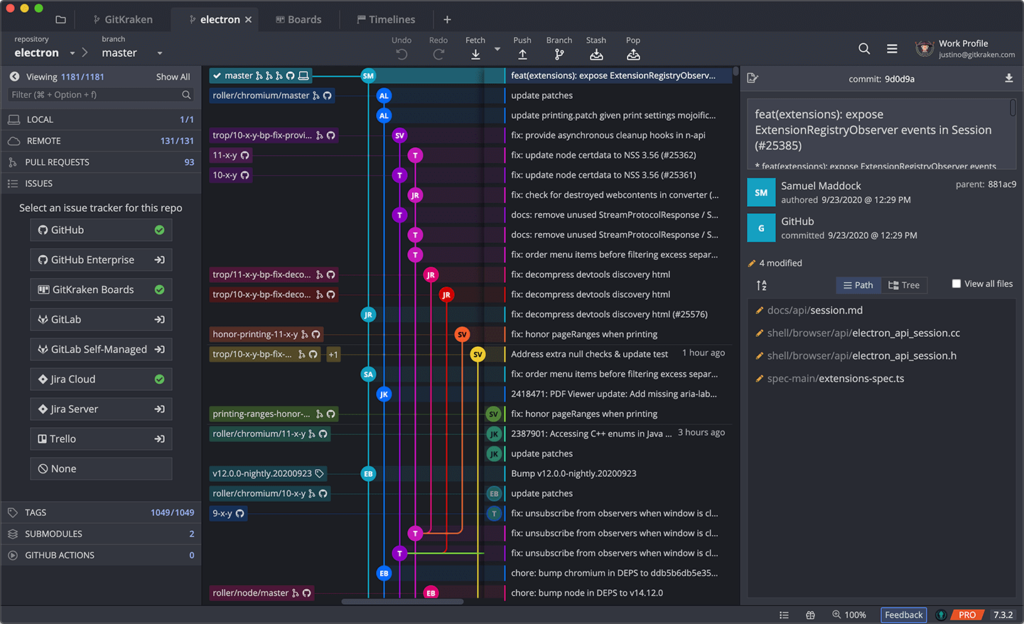
No matter how you use the command line, the CLI in GitKraken Client will help you autocomplete your commands with ease!
Built-In Command Line Tools
At the end of the last section on shell commands, we shared a list of handy shell commands, like head and tail. The commands you type into the shell trigger applications with the same name that automatically come with your CLI shell. Shell commands are quite literally invocations of programs on your computer.
There are a lot of utility programs like those built right into the default experience that give you powerful ways to interact with your machine.
Command Structure
All CLI shell commands and applications follow the same basic structure. That structure looks like this:$ program-name specific-action -options parameters
The first part: $ program-name specifies which application you are calling.
The second part: specific-action tells the application what you want to do. Optionally, you can provide flags, here shown as -options, to cause certain behaviors or settings.
Finally, the parameters are anything that you need to enter to complete the command. Parameters are sometimes optional as well.
This will all make more sense as you start using the command line more. Practice is the best way to learn anything, so open up a terminal in another window, perhaps through a GitKraken Client Terminal Tab, and let’s look at some of the built-in command line tools that come with Zsh.
System Utilities
Programs that are included with your CLI shell that perform specific actions, like ls, or pwd, are generally referred to as system utilities. Aside from the ones we covered in the previous post, there are a number of others built into the shell.
Command Line Date Tool
To print the current date to the screen, use:$ date

There are a lot of options for showing the date through the CLI, including printing in different formats, or just showing part of the date, like a month, or the time of day.
Use man date for the full list of options. Date is a handy CLI program to use while you’re working in the terminal, but it becomes really useful when you start scripting.
Command Line Time Tool
You might think a tool called time would just tell the time, just like date tells the date. Nope. Time executes a command and times how long it took to run. This CLI program also provides helpful information about how much processing time and system resources it took to execute.
To time any command, use the following command line tool:$ time command

In the example above, the time CLI program has executed a check of which version of npm was installed. You can see it took 0.27 seconds of user time, 0.16 seconds of system time, used 66% of the CPU during the command execution, and took 0.651 seconds total from start to finish to execute.
What are the differences between user and system time? There is a good explanation of this surprisingly deep subject of time output on Stack Overflow if you want to learn more. As you start building scripts and writing programs, this command line tool becomes very handy.
Command Line Diff Tool
Git borrows a lot of concepts from the CLI shell. One of the ideas it borrows is running a diff between files to show the differences. In Git, the Git diff compares various versions of the same file; but long before Git version control existed, CLI users could compare multiple files with ease.
To show the differences between 2 files, use the following command line tool:$ diff file1 file2

Tar and Gzip
Built into modern CLI shells is a way to package and compress files into a single archive, which makes it easy to transport projects of any size. While there are two commands in play here, they go together, and it’s uncommon to see one without the other.
The first command line tool is: tar, which bundles things together into a single object, often referred to as a tarball.
The second command line tool is: gzip, which compresses that tarball into a zipped archive that is easy to share.
Files that have been “tarballed” and zipped will have a .tar.gz extension. It’s very common to see many Linux, Open Source, and some macOS downloadables archived this way.
To bundle up the contents of a folder and zip files into a portable archive, use the following:$ tar -czvf name-of-archive.tar.gz directory-or-file

That is a lot of flags! Don’t panic. While this might seem fairly archaic, each of those options stands for a readily understandable idea. Here is what they mean:
-c: Create an archive.-z: Compress the archive with Gzip.-v: Display progress in the terminal while creating the archive, also known as “verbose” mode. Thevis optional in these commands, but it’s helpful to make sure the tool is behaving as expected.-f: Allows you to specify the filename of the archive.
To extract a tar.gz archive, use the following:
$ tar -xzvf name-of-archive.tar.gz

Because you have used -c to create the archive, you will use -x to extract the archive.
Grep
“Grep” stands for Global Regular Expression Print. This is one of the most powerful text search tools ever created. Learning to use this command line tool will help you find individual snippets of code very quickly, expediting your workflow, especially with large repositories.
Grep searches through any specified files, selecting lines that match one or more desired patterns identified through regular expression matching. Each input line that matches at least one of the patterns will be written to the standard output.
To find a string in a single file, use the following:$ grep ‘search_string’ filename

To find a string in any file that shares the same filetype within the same directory, use the following:
$ grep ‘search_string’ *.extension

In this example, we use the wildcard character * to specify that we mean any file that ends with the .txtextension. You can also use the wildcard on its own to search all files.
To find a string in any file in the same directory, use the following:
$ grep ‘search_string’ *

By default, Grep looks only in the present working directory, but it’s easy to tell Grep to search subdirectories as well.
To find a string in any file in the current or any subdirectories, use the following:$ grep -r ‘search_string’ *

There are many, many more options with Grep that will provide all sorts of information and give you a lot of search options. It’s worth spending the time to read through the Grep manual by running $ man grep to become familiar with what is possible. Here is an advanced example using Grep that uses multiple flags.
To find the number of appearances of a string, using a case insensitive search, searching through all subdirectories, starting with the current directory, use the following:
$ grep -Ric ‘search_string' .

In this example, we combined multiple options to give us the count (-c) of how many times the string appears in each file, regardless of capitalization (-i), from all files in the current directory and any subdirectories from the current location (-R).
Piping Grep Output
Back in part one of this series, you learned that Bourne’s Shell, “.Sh” and later Bash, became popular because of the ability to use the output of one command as the input of another.
This ability is called piping and uses the | character as an operator. This is an extremely powerful command line tool that lets you do some pretty complex searches. Let’s look at a practical example:
In the previous example of the command $ grep -Ric, you saw Grep listed every single file it searched, along with the count of how many times each search term appeared.
In that example, it wasn’t very hard to visually scan the output because there were only a few files. But imagine a situation with hundreds, or thousands of files. Reading that output manually to find any files where the search term occurs twice would be nearly impossible. But not for Grep.
To use Grep to search the results of a Grep search, use the following:$ grep ‘search_string' directory/file | grep ‘search_string'

In the above example, we used Grep to search through the output of the first Grep command to look for the string :2. Now we know what file contains the original term Line 2 when it was searched using a case insensitive search. This kind of recursive searching is very helpful when examining log files or debugging code.
You can pipe the output of any command to the input of any other in Bash and Zsh. We will talk more about that in the scripting section.
Searching for what you’re looking for in your repos when working in VS Code gets a lot easier when you add GitLens to the mix. The powerful UI will unlock some real Git superuser powers! Install it today
Command Line Networking Tools
Ping
The Ping tool is used to test whether a particular host is reachable across an IP network. A “ping” tells you how long it took for packets to be sent from the local host to a destination computer and back while showing any packet losses along the way.
This is a very handy command line tool when building web applications or leveraging web services in your code.
To test if a host is reachable on the Internet, use the following:$ ping URL

In the above example, you will see gitkraken.com shows Ping information without any issue, meaning the site in question is working. However, when pinging gitkraken.io, you see an error telling you that the URL is not resolvable, meaning there is an issue reaching it.
cURL
cURL stands for “client URL”. It is a command line tool developed to transfer data from a URL, and it has a lot of options. While there are a lot of use cases for cURL, here are two very useful commands that developers use regularly.
Copying Files from URLs
To copy a file from a URL and store the contents in a local file with the same name, use the following:$ curl -O URL-of-file

In the above example, the entire contents of the file located at https://raw.githubusercontent.com/mcdwayne/moby-dick/main/chapter/001-loomings.md, was copied to a local file, also named 001-loomings.md. Note: we used an uppercase O, not zero or lower case. Also, note: the content of that file was curled from the raw version of the file, meaning there was no header or styling information, just the plain text of the content. If you had tried copying the file from the default GitHub views, it would have pulled all the HTML around the file as well.
Examining Headers of Websites
To look at the header for a website, use the following:$ curl –head URL
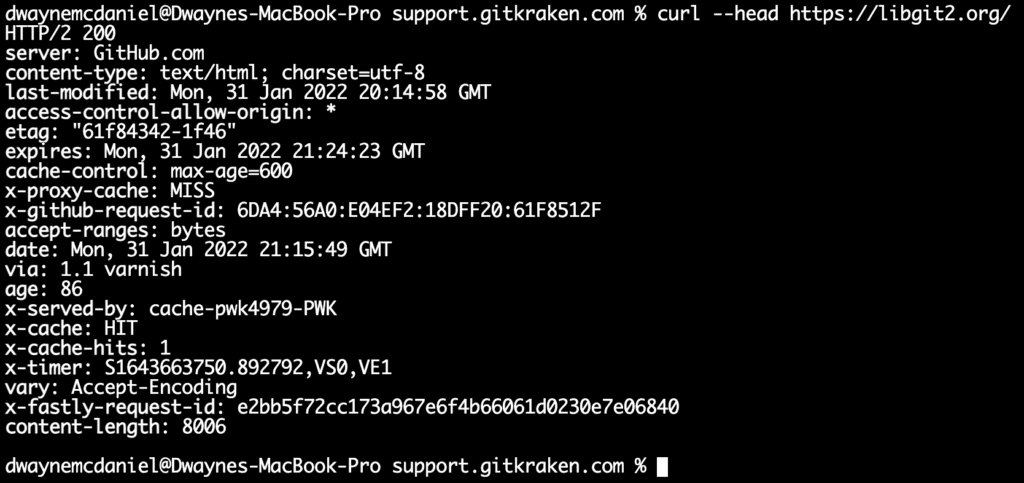
There is a lot of information returned in the above example, but very quickly you can tell:
- What server the response comes from, in this case, GitHub.com, which makes sense as this is a GitHub page
- The site was last updated on Mon, Jan 31, 2022
- The site uses Varnish as a caching server
- The cache was HIT and it was 86 seconds old when it was hit
The curl –head command line tool is extremely useful when debugging caching and web application issues.
SSH
SSH stands for Secure Shell Protocol, and in simplest terms is a way to establish a connection to allow you to use a shell on another computer. It is a secure way to manage a remote server or connect to a remote service.
Git hosting services like GitHub, GitLab, and Bitbucket rely on SSH to efficiently transfer data back and forth between users. While most of the time, services require an existing account and specific log-in credentials, there are some public services that also allow SSH connections. The one in this guide uses Telehack, which is an amazing resource for safely exploring what the command line can do!
To connect to a remote server using SSH, use the following:$ ssh username:hostname-or-ip-address -p port-number
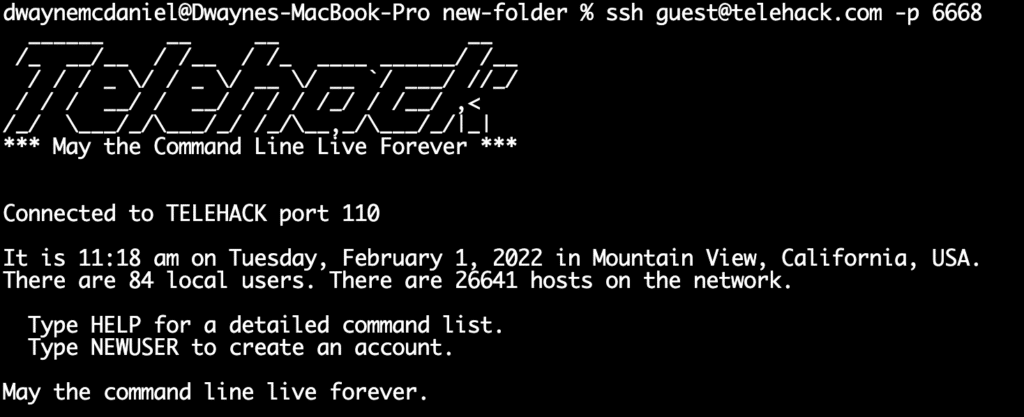
In the above example, we connected as a guest, which is not commonly allowed on most hosts. Most of the time you will need to have a user account and set up a password or connect with an SSH key pair.
While not going deep into it here, essentially an SSH keypair is a set of 2 very long strings of letters and numbers, one public and one private, that allow you to safely authenticate across the Internet. You share the public key with a remote service and the private one stays on your devices. When you first connect, a complex algorithm based on a trapdoor function runs to see if the public key and private key correspond. If they do correspond, then a secure encrypted connection is established.
ssh-keygen
When connecting to a remote service through SSH, you will most likely need to authenticate with an SSH key. Setting this up is rather straightforward, and is built into all CLI shells.
To generate a new SSH key pair, use the following:$ ssh-keygen

There are a lot of optional parameters you can supply in addition to the command, but entering the command on its own will prompt you for the needed information to complete the creation process. The example image above only shows the first step.
After the keys are generated, you can, by default, find the new keys in your machine’s ~/.ssh folder. There will be two files output: id_rsa and id_rsa.pub. The .pub stands for public, and is the one you should add to remote services. Each service will provide instructions on how best to upload and store your public key.

A few final tips on SSH keys:
- Never, ever share your personal private key with anyone or any service. If a service requires you to upload a private key, it is a best practice to make a new dedicated key pair for that service. RedHat has a good multiple SSH key guide for managing this pattern.
- Never copy/paste any key into any codebase.
- Change your SSH keys and passphrases often. Try to ensure that if a bad actor does discover a leaked key, it expires before they get a chance to use it.
- Revoke SSH keys on services you are no longer using. Only actively used services should have your public key at any time. Combined with rotating your keys on a regular basis, this is a great security best practice to stay safe and secure.
Editing Text with Command Line Tools
Vim
Vim, which stands for Vi iMproved editor, is one of the oldest text editors around, and by many accounts, the hardest to learn. Developed with a certain worldview of never needing to move your hands from the keyboard, Vim is an extremely powerful editor, once you get over the intensely steep learning curve.
If you ever make a Git commit and do not provide a Git commit message, you will likely get dropped into the Vim editor. It is set as the default text editor on many systems you will encounter, so it is good to have at least some familiarity with this command line tool.
The most common question people have about Vim is: “how do I quit Vim?” The answer to that actually reveals a bit about how Vim works.
To quit Vim, follow these steps:
- Press the esc key
- Type
:wqand press enter/return.


When you press the esc key, you are telling Vim you want to enter “command mode.” There is only one other mode to worry about, “insert mode,” which allows you to type in the file. The command mode allows you to enter higher-level commands that affect the editor itself.
All commands begin with a colon “:”. The command :wq stands for “write the contents on the screen to the file,” meaning save the file, and quit out of Vim.
There are a lot of advantages to learning Vim, from ergonomics to quicker file navigation, and ultimately being able to write shippable code faster. A great resource for learning Vim is the book “Practical Vim” by Drew Neil.
Nano
Fortunately, there are more options for a text editing command line tools available on most systems, one of which is Nano. This text editor is also pretty powerful, with many commands and options available, but unlike Vim, it is much friendlier to use, as it presents onscreen options that inform you how to do things like save and quit the application.

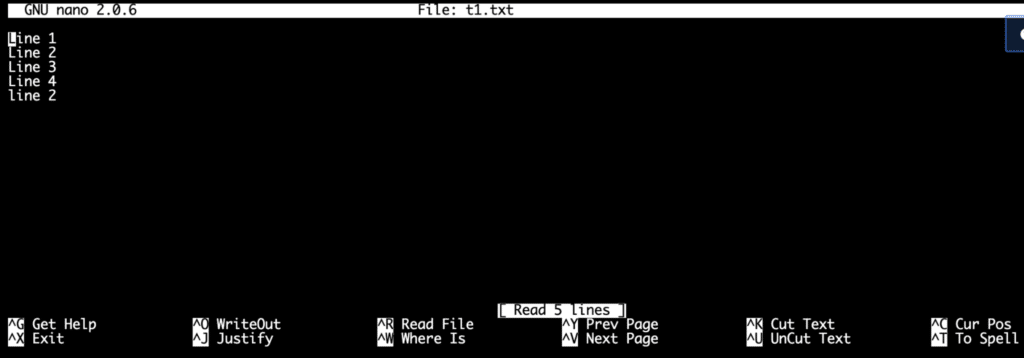
As you can see from the example above, the bottom of the Nano interface provides a list of options you can execute by pressing the cmd key plus the desired option’s letter.
For example: to exit Nano, type cmd+x, or, to cut a line of text type cmd+k.
Text editors have come a long way since Vim. Take VS Code for example, which is much more user friendly and can be extended with powerful tools like GitLens.
Sed
One other editing option worth noting is the “stream editor” sed. By stream editor, they mean a command line tool that reads through a file and makes changes as it finds instances of a term you want to find and replace.
Like Vim, it can be a little tricky to understand at first, but this is an exceptionally powerful command line tool for editing multiple files at once. You can sort of think of it as a global search and replace tool, as that is one of the primary use cases, which can run across multiple files and directories.
To search and replace a string in a file, use the following:$ sed -I ‘.ext’ ‘s/old-string/new-string/options’ filename
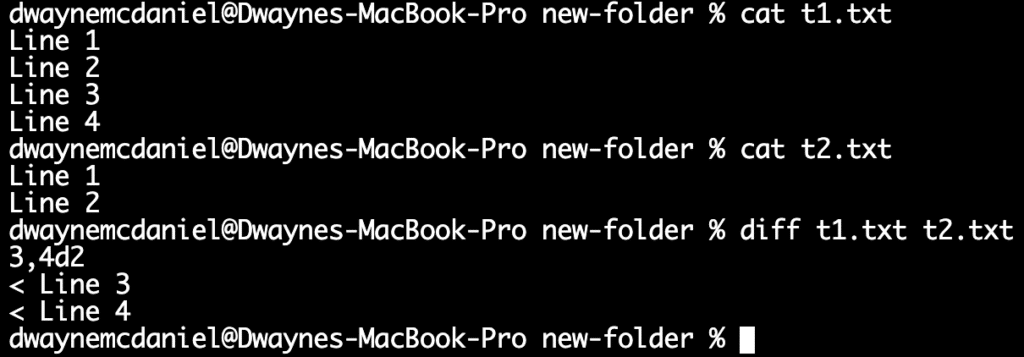
The exact command ran in the above example was: sed -i '.bak' 's/Line 2/Line X/gi' t1.txt.
Let’s break that down quickly.
- The
-istands for “edit files in-place”. - The
.baktells sed that you want to make a copy of the original file with a.bakat the end, which is shorthand for “backup”. - The heart of the sed command is the regular expression search in the middle, the
's/Line 2/Line X/gipart.- The first
sstands for ‘substitute’ which is what we want sed to ultimately do. There are other options butsis the most common. /Line 2/Line X/tells sed what to look for and what to replace it with.- The options at the end
gistand for globally, meaning every occurrence in the file, and case insensitive.
- The first
- The last part is just the name of the file that the search was executed against.
That might seem a bit dense and confusing at first, but it’s well worth your time to understand this command line tool. Imagine a scenario where a change to a billing system means you need to modify all the instances of a variable name in the codebase. Finding and replacing the string in thousands of files by hand could take days or weeks and is very error-prone. Running sed against the entire codebase takes minutes and will replace every single instance without fail.
Installing More Command Line Tools
There is a whole world of command line tools out there that you can install right now to extend the capabilities of your computer. Before diving into a few examples of the range of command line tools out there, it’s a good idea to first understand how your computer manages applications in general, and how to install and uninstall various applications.
Package Managers
On *NIX systems like Linux and macOS, software for the CLI is mostly managed by package managers. These CLI programs make thousands of free command line tools available to you and require very little effort to install. These package managers also handle all the needed dependency management for each tool, meaning that if another library or resource is needed, it automatically installs and configures those as well.
If you are on macOS, you can use Homebrew. If you are a Linux user, there are a variety of package managers you can leverage, with APT and yum being the most popular for Linux distributions. The following examples are shown on macOS using Homebrew.
To install a CLI program with Homebrew, use the following:$ brew install application-name

To remove a program with Homebrew, use the following:$ brew remove application-name

Finding Software
Homebrew maintains a list of just under 6,000 packages, all of which can be downloaded, installed, and used for free. APT does not have such a centralized list, but there are multiple open source community sites that maintain lists of APT packages. However, when considering obtaining new applications, looking at all of the available packages for all possible use cases is overwhelming at best, and is definitely not the best approach to finding new command line tools.
For just about any use case you can imagine for a command line tool, there is likely another developer in the world who has attempted to create another tool around it. A quick Internet search about the general nature of what you want to do, plus the keyword APT or Homebrew, will help you start narrowing down your search.
Additionally, there are over 128 million public online repositories, many of which have command line tools you can download and install. This is in addition to the package managers! But sometimes, there are situations when you will just want to or need to build your own tools. We will look at that in more detail in another part of this series. For the time being, let’s move forward and look at a small sampling of command line tools you can install right now to run in your terminal!
No matter what you’re working on in Git, or what command line tools you need, GitKraken Client has you covered with the GitKraken CLI’s helpful autocomplete suggestions!
Common Command Line Tools to Check Out
By no means is this an exhaustive list, but meant to serve as a small sampling of helpful tools to get you used to installing and using CLI tools. You can install these programs on macOS by using $ brew install program-name.
Calc
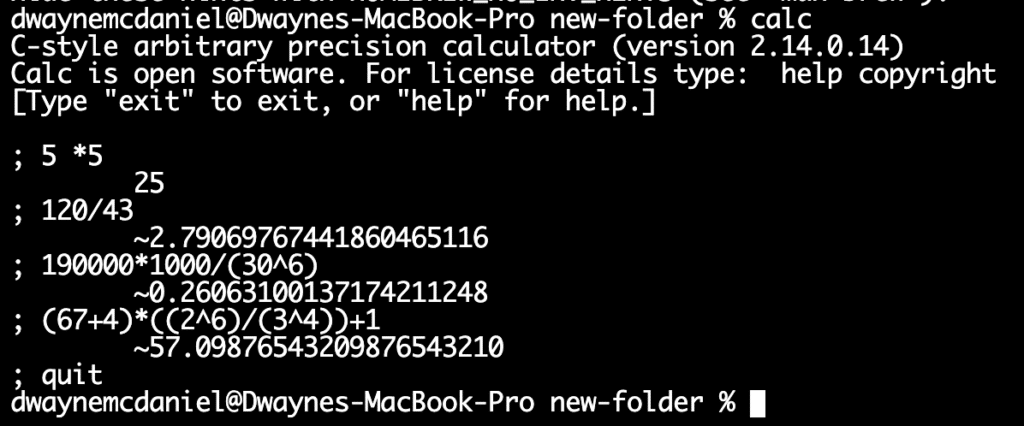
Calc is a calculator that is easy to use but also very powerful. Why not just open a GUI calculator on your computer or phone? For starters, Calc lets you pass through the desired calculation while you are calling it, which saves time if you’re already working in a terminal.
To perform a calculation with Calc, use the following:$ calc first-number operator second-number

This command line tool is pretty handy and straightforward. It works for all basic operations, and you can even figure exponential powers using the ^ character. Calc is also completely customizable. See man calc for full information on what options are available.
Calc also has an interactive mode where you can perform multiple calculations until you type exit or quit.
To run Calc in interactive mode, use the following:$ calc
Tree
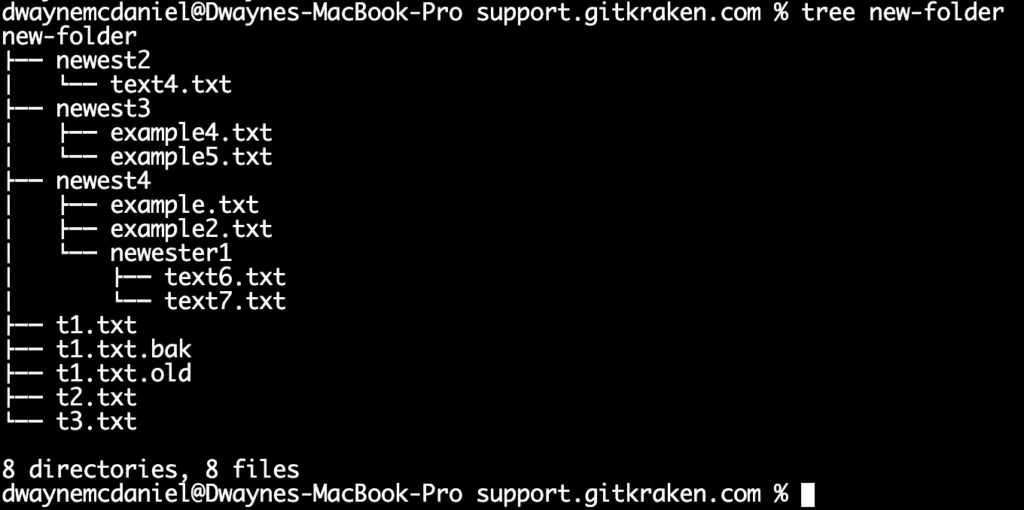
Tree lists the contents of a directory, and subdirectories, in a tree-like format. This is very useful for quickly understanding the file structure of a repository.
To see the Tree view of a folder, use the following:$ tree path/to/folder
ffmpeg Command Line Tool
The ffmpeg command line tool is an extremely fast video and audio converter. Because there is no GUI to render to the screen, this command line tool can perform actions directly against media files with much greater speed.
There are almost no limits for what formats, sizes, speeds, frames per second, and any other video conversion options you want to invoke. There are many guides on how to best get started with ffmpeg, and it’s a subject that requires much more space than we can give it here.
While there are a lot of use cases for the ffmpeg command line tool, one of the most common is converting videos to use the h265 video encoding. This high-quality format takes about a tenth of the space without sacrificing resolution.
To convert a video to h265 encoding at 28 frames per second, use the following:
$ ffmpeg -i source-video-file -vcodec libx265 -crf 28 uutput-file-name

There is a lot going on in the above example, so if it looks overwhelming to you, don’t panic! The more you explore this and all command line tools, the easier it will be to understand what is printed to the screen.
After running that command, the file shrank in size from the original 86MB to 13MB (see below).

Imagemagick
Imagemagick is essentially Photoshop for the command line. As with ffmpeg, the lack of a GUI is an asset here, since eliminating the need to draw the image to the screen means it requires a lot less processing power.
It’s a very richly featured image manipulation command line tool that can resize, blur, crop, despeckle, flip, re-sample, and much more. Unlike with other command line tools on this list, the application name is not how you call the application.
To invoke Imagemagick, you call convert.
To resize an image with Imagemagick, use the following:$ convert -resize new-widthxnew-height original-image name-of-new-output-image

In the above example, we attempted to resize an image that was 2694×382 pixels to 300×240, which would have stretched the image in an unnatural way. Instead, Imagemagick preserved the ratio for us automatically and output an image with dimensions of 300×43. We can easily get this information from Imagemagick by asking it to list the image info.
To get the width and height of an image using Imagemagick, use the following:
$ convert image-name -format "%wx%h" info:
There is a lot more you can do with Imagemagick. There are a good number of guides for using Imagemagick for a variety of use cases. One of the more common use cases for this command line tool is to resize images.
ddgr
If you are a fan of DuckDuckGo, the search tool in the browser, you might enjoy having DuckDuckGo in the command line.
To perform a web search using DuckDuckGo from a terminal, use the following:$ ddgr searchterm
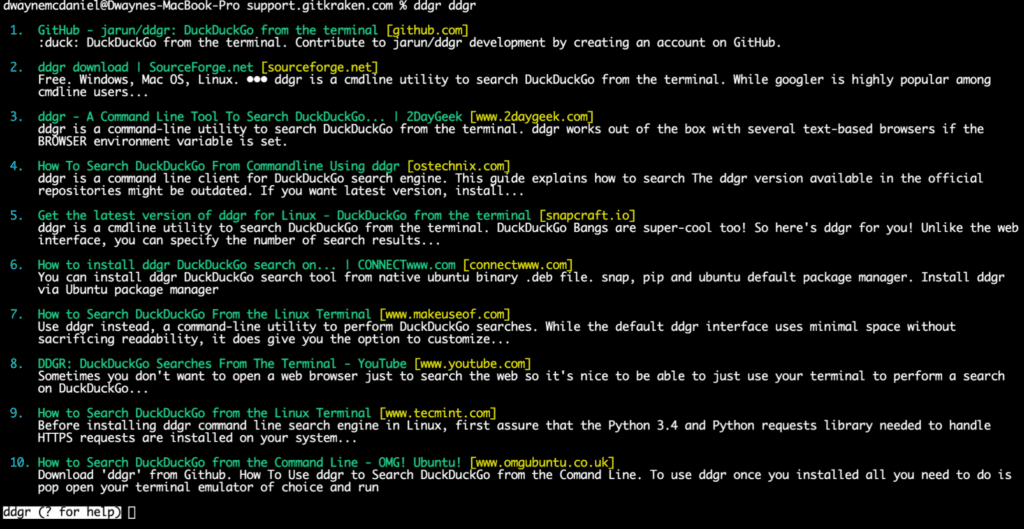
Once it displays the search results, you can choose which result you want to open in the system’s default browser. While this might seem like a novelty, having the ability to perform a web search from the command line can help you stay in a developer flow and keep focus by reducing context switching.
If you open your browser the normal way, there is the chance for a lot of distractions as alerts and notifications steal your attention. With ddgr, you can look up documentation or example code, open the browser directly to it, get what you need, and jump right back to work. If you prefer the results from Google, then you can check out googler.
WP-CLI
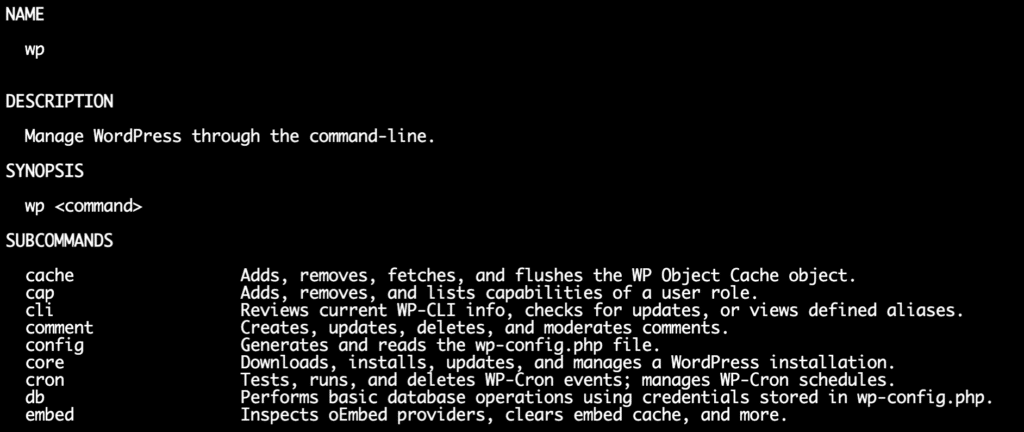
If you are managing a WordPress website, this is a very handy command tool to have in your workflow. The WordPress Command Line Interface lets you manage WordPress from the terminal. Anything you can do through the Admin interface, you can accomplish through WP-CLI, plus a lot more.
To run the WP-CLI, use the following:$ wp
BackstopJS
BackstopJS is a visual regression testing command line tool for web pages. In essence, it takes screenshots of URLs and compares them pixel-by-pixel to see if they are the same, throwing an error if they aren’t. This is most commonly used in the testing phase of website development to make sure whatever is on staging matches the development environment, catching unexpected CSS errors before the code is finally pushed to the production environment.
BacktopJS, unlike all the other command line tools we’ve looked at so far, requires you to specify settings in configuration files to use it. The more advanced the use case or more complex the tool’s concept, the more and more you will run into this situation.
For BackstopJS, you need to set the test URL, the reference URL, the website image to compare it against, screen resolution, and a few other factors in a configuration file. There is a bit of a learning curve, but if you need to test your web application deployment pipeline, BackstopJS can save the day.
To check if two URLs contain the exact same website image, use the following:
$ backstop test

npm
npm is less a command line tool and closer to a package manager and orchestration suite for JavaScript based applications. It’s included on this list to show the scope of what command line tools are capable of, and npm can do a LOT of things. According to the official docs, npm allow you to:
- Adapt packages of code for your apps, or incorporate packages as they are.
- Download standalone command line tools you can use right away.
- Run packages without downloading using npx.
- Share code with any npm user, anywhere.
- Restrict code to specific developers.
- Create organizations to coordinate package maintenance, coding, and developers.
- Form virtual teams by using organizations.
- Manage multiple versions of code and code dependencies.
- Update applications easily when underlying code is updated.
- Discover multiple ways to solve the same puzzle.
- Find other developers who are working on similar problems and projects.
That is far too much to cover here, but installing npm, or making sure this command line tool is installed on your machine, is the first step.
To check the version of npm you’re using, or just to tell if it’s installed, use the following:$ npm –version

Git
Last on our list, but number one in our hearts at GitKraken, is Git, the stupid content tracker. That is how the official Git manual refers this command line tool (see below).

There is a lot to say about using Git on the command line, and you can read much more about this in our learn Git library. No matter what skill level you’re at, there is content for you on the GitKraken website that can further your knowledge of Git concepts like Git rebase, Git push, Git cherry-pick and so many other concepts.
GitKraken Client offers a CLI through Terminal Tabs which exposes a command prompt and lets you run any Git command, even making auto-complete suggestions as you work. You get the best of both the GUI and the CLI with GitKraken Client; when you’re in the Terminal Tab, you still get the extremely helpful graph visualization panel to easily track branches and commits!
If you haven’t given GitKraken Client a try, it’s free to get going and we think you will love it!
Customizing User Experience with Command Line Tools
So far in this series, you’ve looked at the history of the CLI shell, some basic navigation commands, and now some CLI programs you can run, and how to load more command line tools on your computers. In the next installment of this series, you’re going to learn about customizing your user experience and making it your own – so stay tuned!


