Deploy the GitKraken Git GUI with GitLab
Join leading organizations using GitLab with GitKraken

Get started using GitKraken for free with GitLab
See How Teams Use GitLab and the GitKraken Git GUI
Migrating to Git as your distributed version control system will improve the overall efficiency of your development teams, but initially, developers will face a steep learning curve. Failure to address this challenge often results in increased time to ship your code and decreased code stability. GitKraken creates a seamless process for onboarding to Git and helps streamline and standardize workflow processes.
Many of the features offered by the GitKraken Git GUI, like issue tracking integrations and intuitive merge conflict resolution, take team collaboration to the next level. GitKraken’s Gitlab integration also offers the ability to accomplish the following actions.
Click on the links below to navigate to the related sections on this page:
- Generate a GitLab SSH key pair
- Clone from your GitLab repo list
- Add remotes for GitLab.com repositories
- Add remotes for GitLab Self-Managed repositories
- Create and view GitLab pull requests with templates
- View, manage, and edit GitLab Issues
Looking for more resources for getting started with GitLab and GitKraken?
Generating Your GitLab SSH Key
After you’ve authenticated the GitLab integration in GitKraken, you can easily generate a GitLab SSH key.
In the same Integrations view, you will see a button that says Generate SSH key and add to GitLab and voila! What used to take you 8 steps is now accomplished in a single button click!
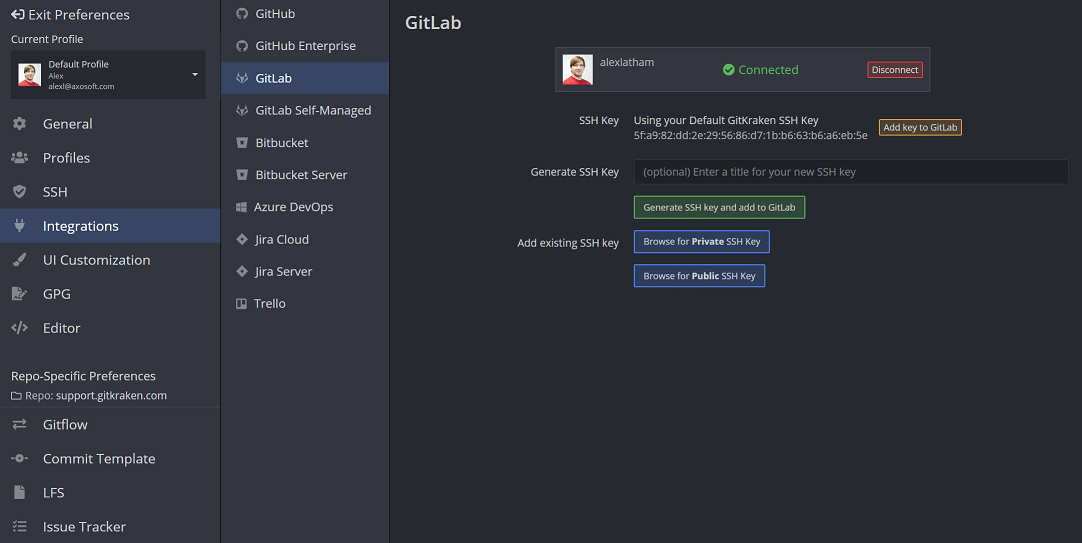
Alternatively, you may choose to add an existing GitLab SSH key by browsing for a public or private key.
Using GitKraken to create and manage your GitLab SSH keys will allow your team to securely perform daily Git actions, like push and pull, to private remote repositories on GitLab.
The process for generating an SSH key for your GitLab Self-Managed integration works exactly the same.
Get a refresher on how Git SSH works with our beginner Git tutorial video.
Connecting to Multiple GitLab Accounts
GitKraken Pro’s multiple profile support allows you to easily switch between profiles in GitKraken, each with their own associated GitLab Self-Managed accounts.
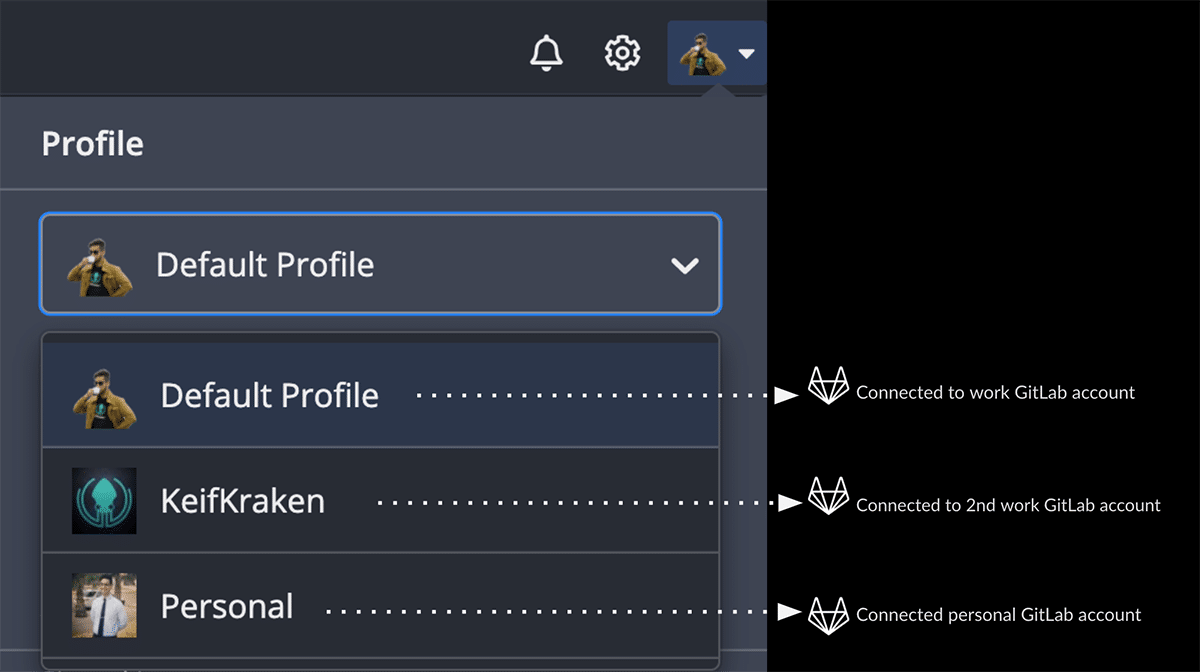
This prevents the need to connect to a different GitLab remote every time you need to switch to a new repository.
Clone Your GitLab Repos with OAuth Integration
GitKraken’s GitLab integration provides helpful information about your remote GitLab repositories.
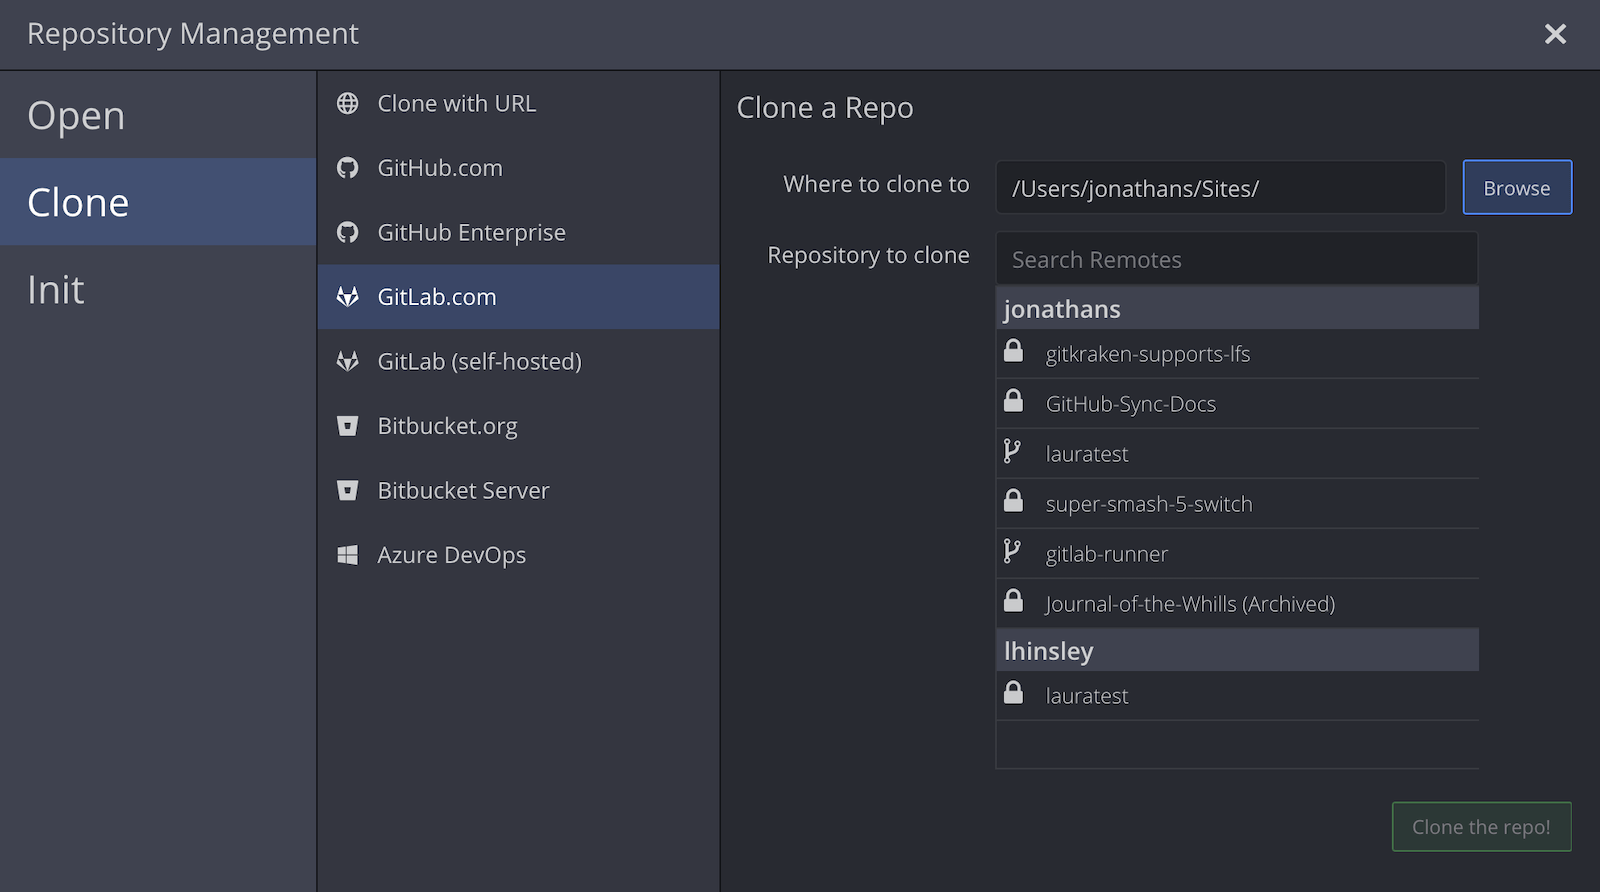
You can search through your existing GitLab repos when cloning your remote repository .
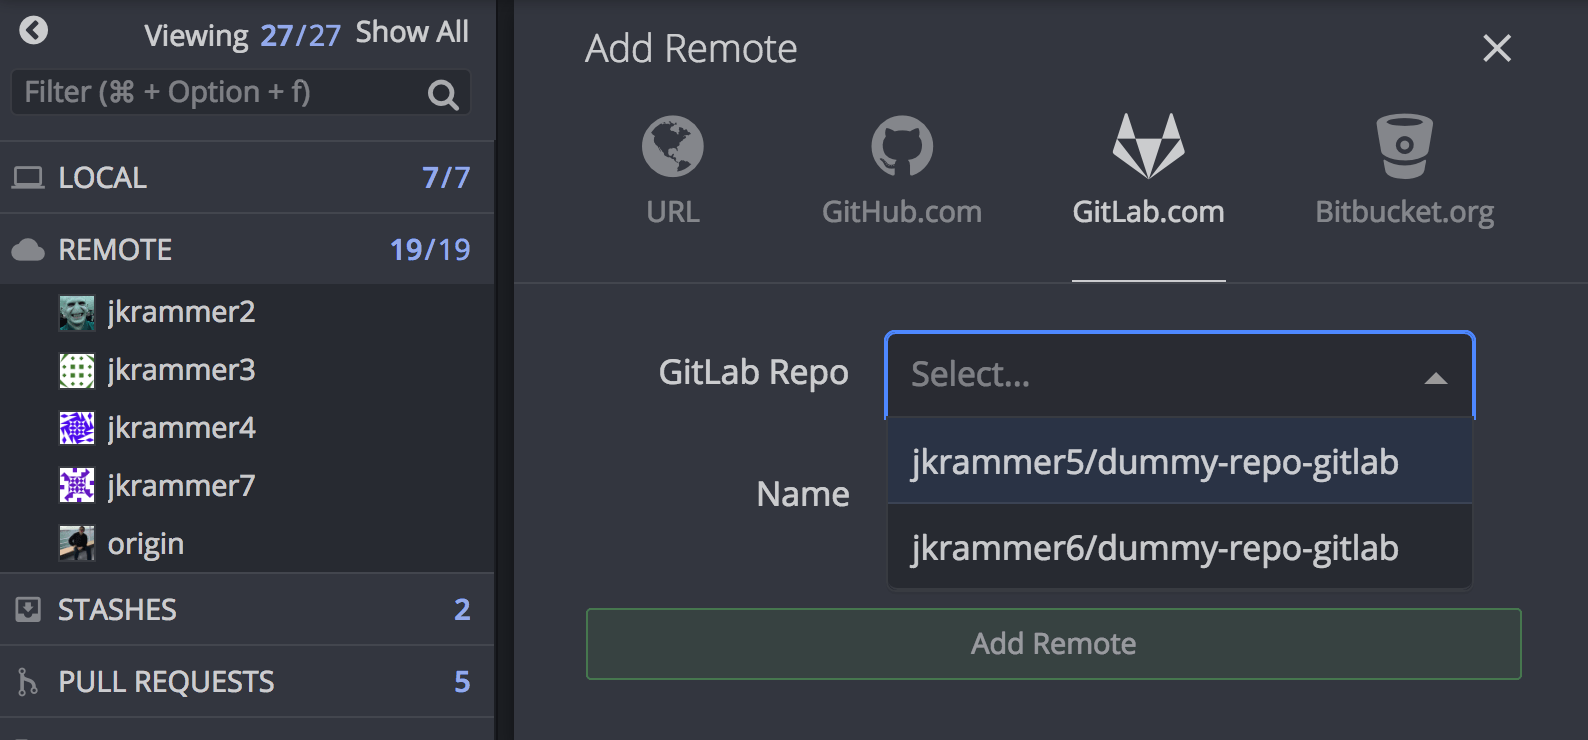
GitKraken also presents a list of the current repository’s forks when adding remotes.
Setting Up Your GitLab Integration
If your team is using GitLab.com or GitLab Self-Managed to host your repositories, the GitKraken Git GUI can help streamline your workflow and make working with Git much more intuitive!
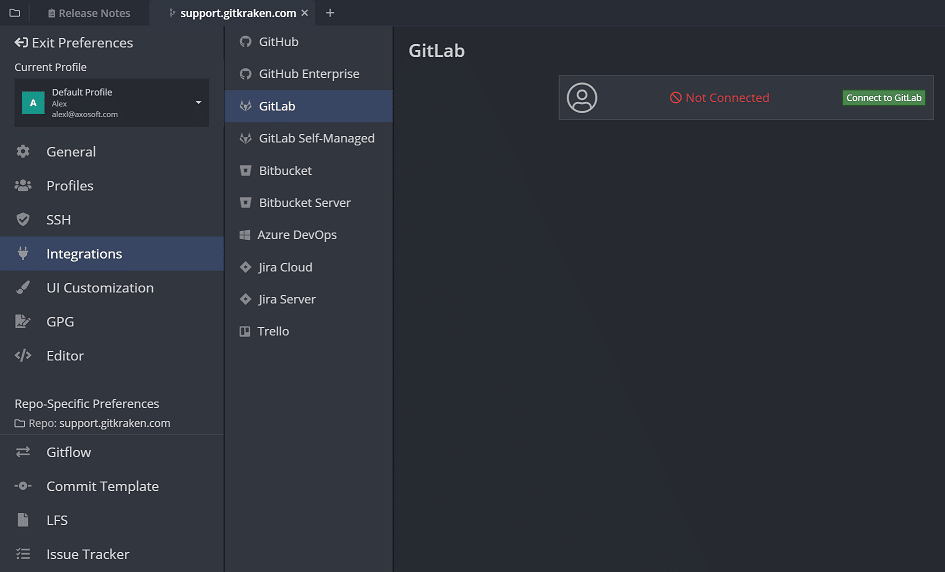
The authentication process for GitLab.com is quick and easy. Navigate to Preferences -> Integrations where you can select GitLab.com.
After you click the Connect to GitLab button, GitKraken will make a call to the GitLab api. This will open your default browser where you can continue with the authentication process on GitLab.
Remote repositories are another aspect of Git that add value to team collaboration. By adding remotes, users can get visibility into branches being worked on by team members, and vice versa.
Instead of using the git remote add command, connecting a remote repository in GitKraken takes just one click. After you have set up the GitLab integration, you will see a list of the GitLab remote repos you have permissions to access.
GitLab Self-Managed Integration
Now, if you’re using the GitLab Self-Managed integration with GitKraken, you will utilize a Personal Access Token (PAT) to connect.
Simply navigate to the Preferences menu and then Integrations. From here, you will enter your GitLab Host Domain and click Generate a token on GitLab. This will open your default web browser and will prompt you to log-in with your GitLab credentials and generate an access token.
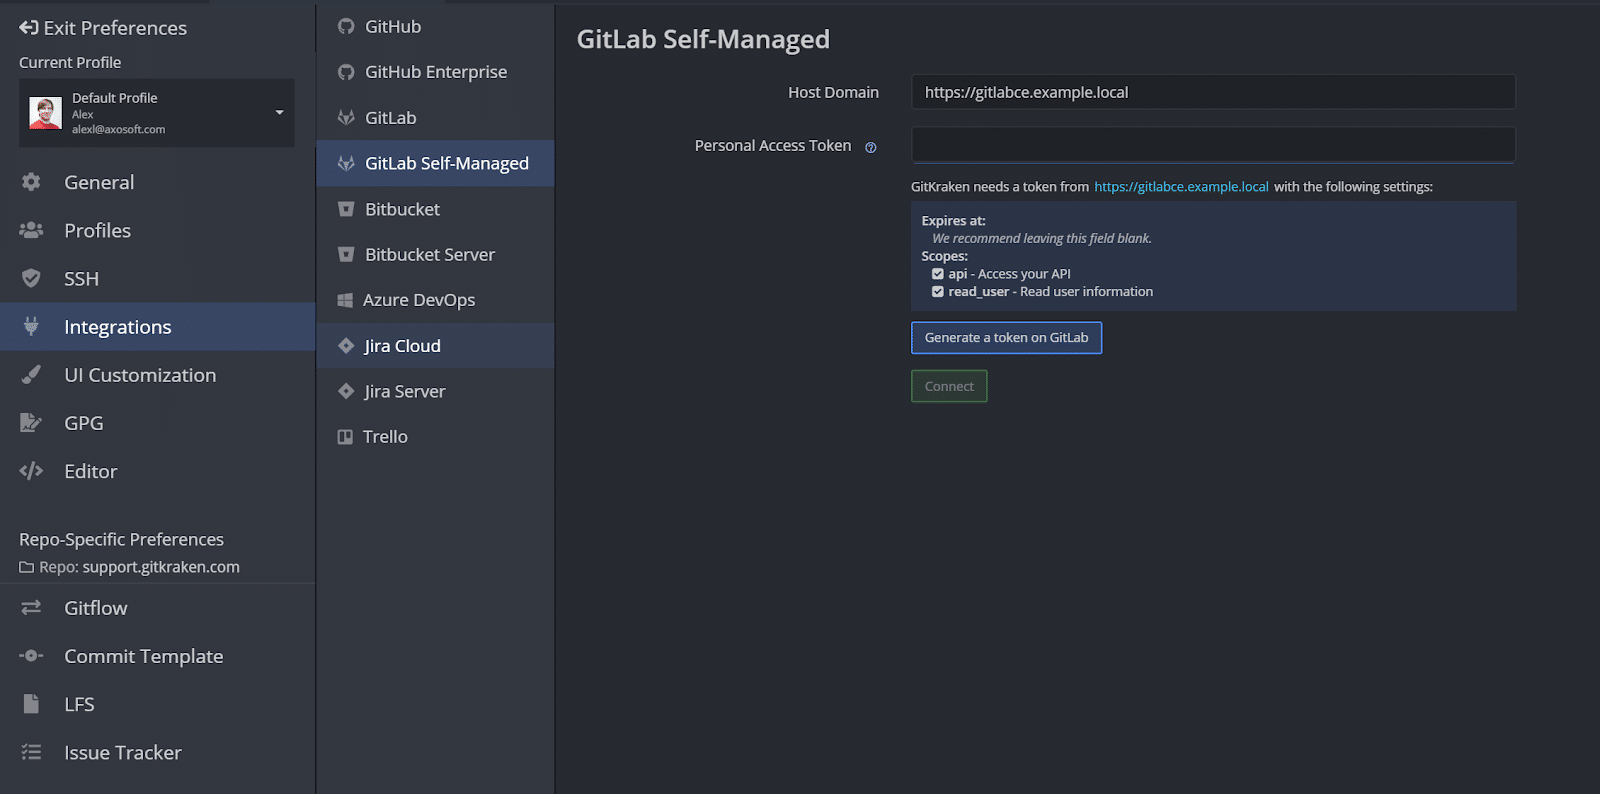
From your GitLab account, you will need to obtain the permissions that need to be assigned to the token on your GitLab Self-Managed server, including api and read_user scope. We recommend leaving the Expiration at field blank.
Copy your token and paste it into the Personal Access Token in GitKraken and click Connect to authenticate your GitLab Self-Managed integration.
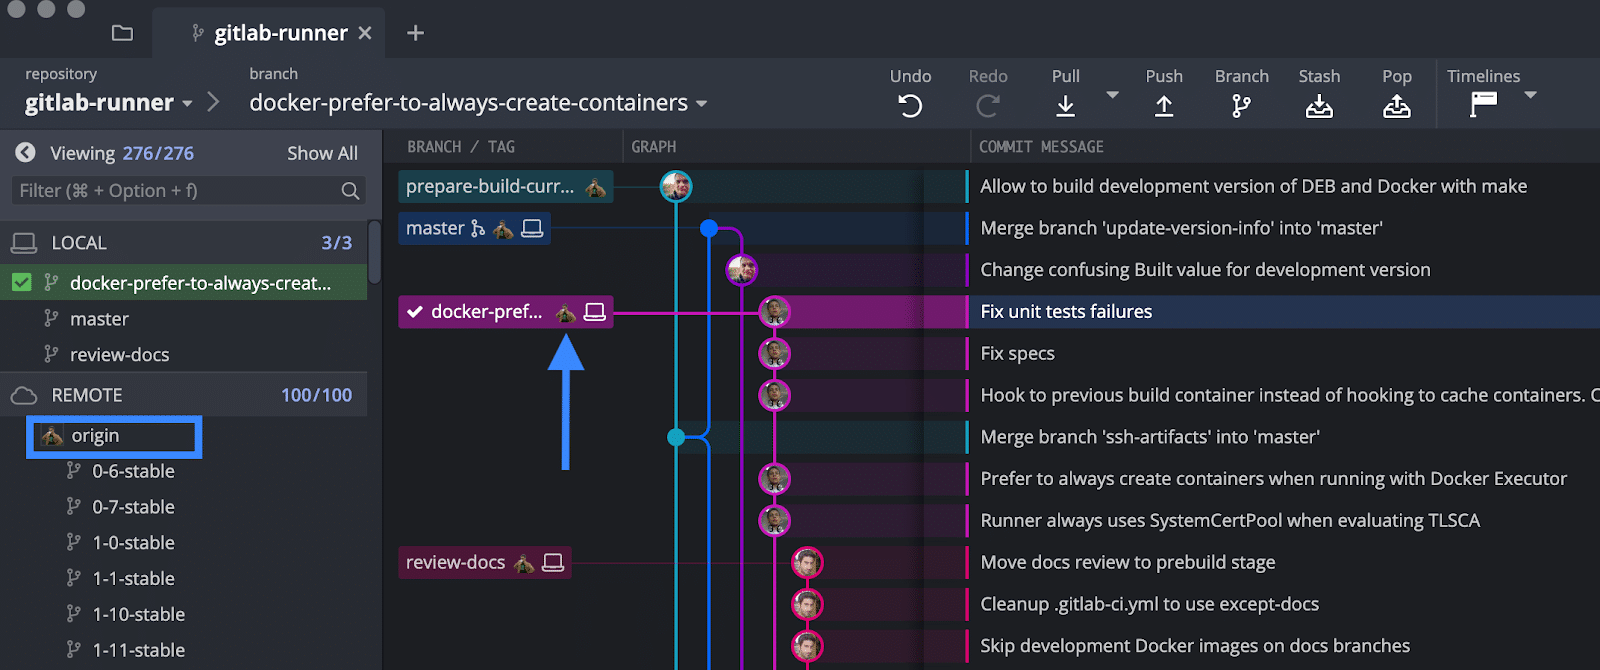
After you’ve authenticated your GitLab.com or GitLab Self-Managed integration, GitKraken will display whatever remote avatar you have set for your GitLab account directly on your graph in GitKraken, helping to easily identify your GitLab remote repos.
GitLab Pull Requests
Yet another feature to improve teamwork and processes, GitKraken allows the ability to quickly and easily create pull requests in-app. Simply drag-and-drop one branch onto another branch from GitKraken’s central graph to access the pull request option.
This drag-and-drop action will open a pull request template, a best practice that encourages code consistency and a more efficient review process.
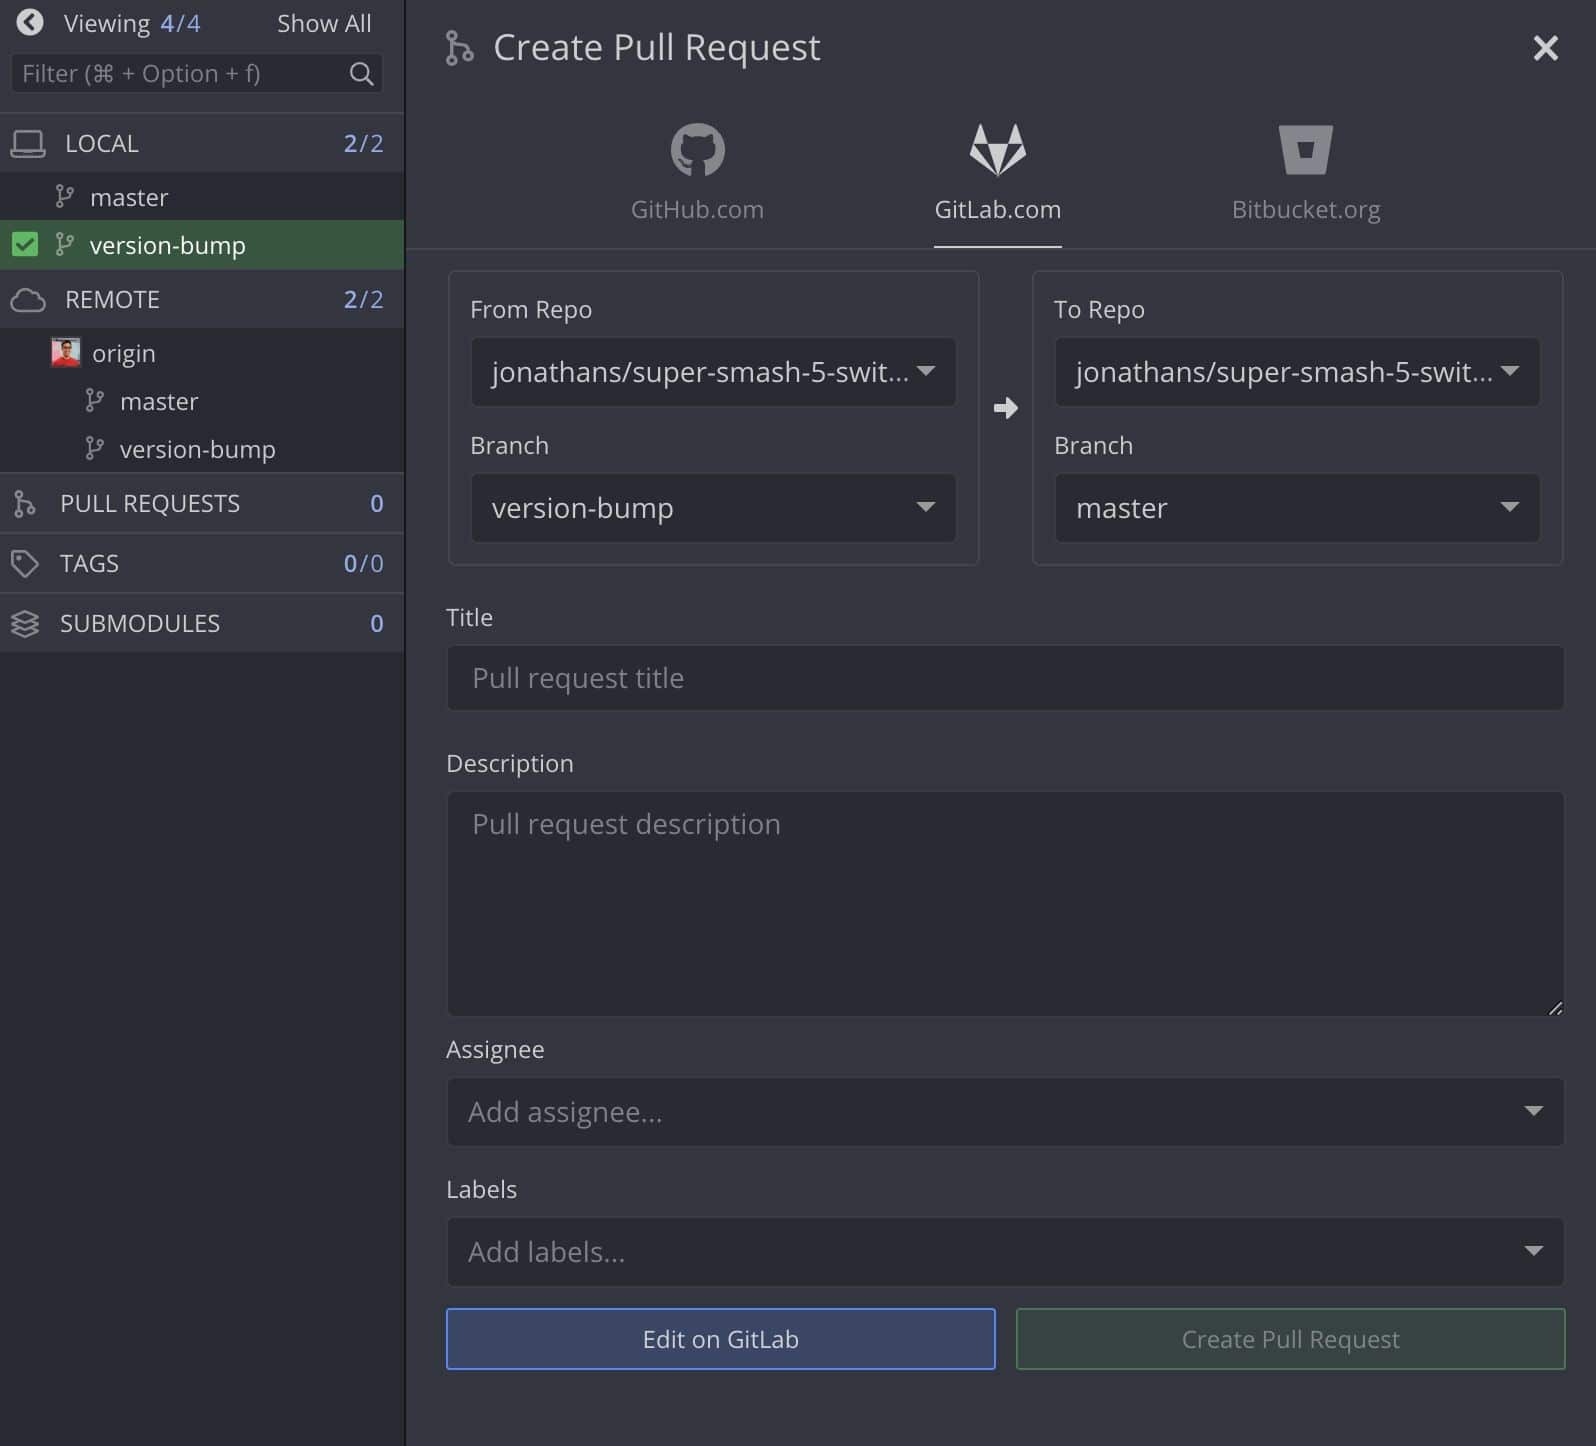
The pull request template will open with prefilled repo, branch, PR title, and PR description. GitKraken’s GitLab integration allows users to add assignees and labels to your pull requests, and you can edit the prefilled title and description before clicking to Create Pull Request.
Get started using GitKraken for free with GitLab
GitLab Issues Integration
The GitLab Issues integration is extremely simple to set-up in GitKraken; the GitLab remote repository integration and GitLab Issues integration share the same connection.
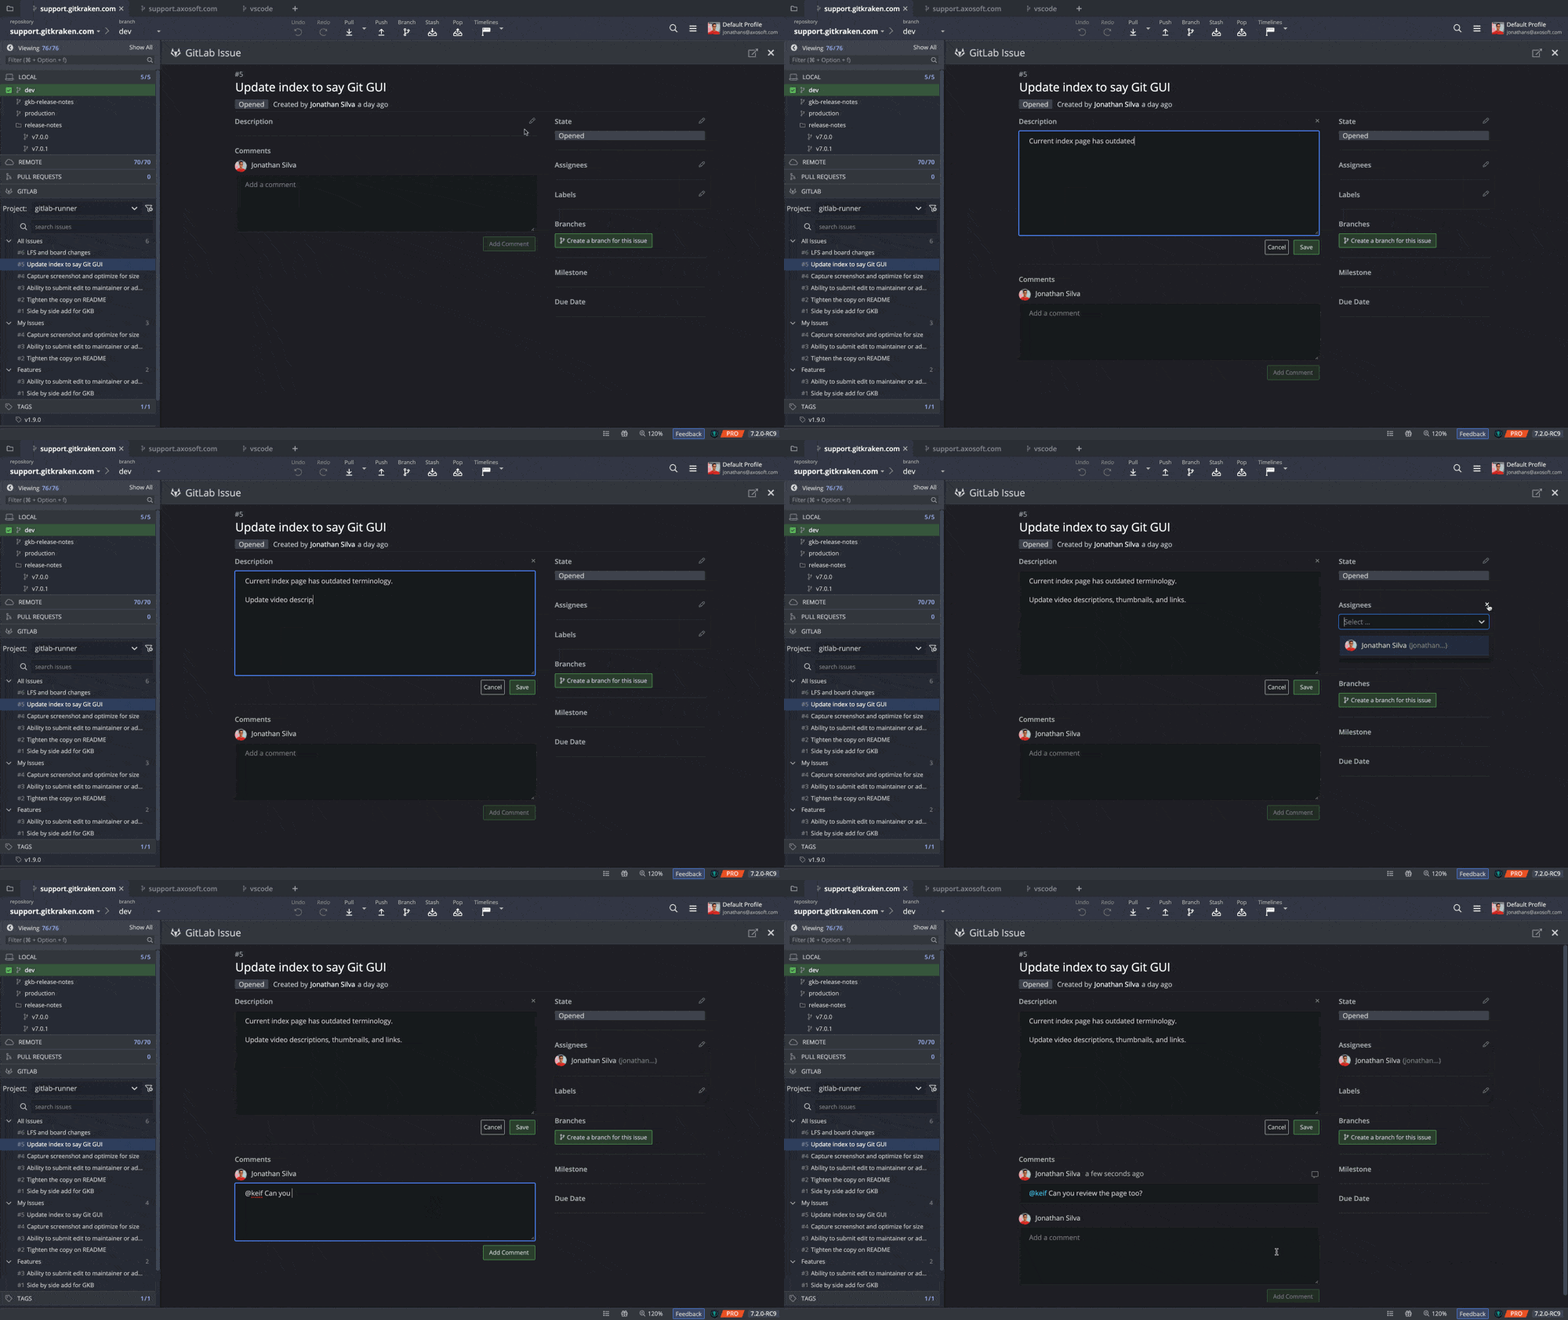
Once the GitLab integration has been connected, your GitLab issues will appear in the left panel in GitKraken where you can view and filter them.
Hover over one of your GitLab issues to see a preview of the issue title, description, labels, milestones, and assignees.
Similarly, you can click on a GitLab issue to view complete issue details in a new pane. From here, you can make edits to the title, description, assignees, labels, and state, make comments, and reply to GitLab issues.
GitLab Training Resources
To help decrease the pains often associated with migrating and onboarding new team members to Git, we’ve created the “Deploying GitKraken with GitLab at Scale White Paper”, designed specifically for large teams and enterprise organizations.
In this white paper, you’ll learn how to tackle this challenge head-on! We’ll share best practices for how tens-of-thousands of teams have successfully deployed Git, GitLab and the GitKraken Git GUI across their organizations.
- Benefits of Git
- Migrating to Git from other source control methods
- Challenges developers face adopting Git
- Training and educational resources for learning Git
- Best practices for large scale deployments of Git, GitLab and the GitKraken Git GUI
- How to deploy the GitKraken Git GUI with GitLab to enhance your workflow
- Maintaining security standards with Stand-Alone & Self-Hosted
- Best practices for deploying Stand-Alone & Self-Hosted
How to use GitLab with the GitKraken Git GUI
If your team is using GitLab.com or GitLab Self-Managed to host your repositories, the GitKraken Git GUI can help streamline your workflow and make working with Git much more intuitive! Distribute this tutorial video to your team, and you’ll have everyone up and running with Git, GitLab and the GitKraken Git GUI in half an hour.
This video covers the following topics:
- Setting up GitLab.com integration
- Setting up GitLab Self-Managed integration
- Working with remote repositories
- Overview of the commit history graph
- Making a change, staging and committing
- Pulling a change from a GitLab remote
- Cloning a repository
- Undoing
- Creating a feature branch and merge request
- Resetting a branch to a commit
- Adding a remote
Get started using GitKraken for free with GitLab
© 2025 Axosoft, LLC DBA GitKraken
Team Collaboration Services
GitKraken Browser Extension
GitLens for VS Code
30M+ INSTALLS
GitKraken CLI
winget install gitkraken.cli


